A few years ago, as I was scrolling mindlessly through my Facebook News Feed, I found an article that told me I was using paper ketchup cups all wrong.
It turns out you're supposed to fan out the sides of the cup to increase ketchup capacity, like this. Who knew? Well, I recently applied that sense of adventure to another thing I love -- Google Docs. And what I found was just as life-changing.
Sure, you may have been using Google Docs for years, but just as I found, there are likely several useful features you have yet to uncover. For example, did you know you can look at a document's entire revision history to figure out what was changed and when?
Here are 21 sweet features Google Docs has to offer that aren't on many people's radar.
1. Add Fonts
When you create a new document, Google Docs starts you off with nearly two dozen native fonts you can choose from using the dropdown list on your top editing toolbar. But, there are dozens more fonts and typefaces available to you in that same dropdown.
To add additional Google Doc fonts, open your document and click the fonts dropdown third box from the left on your editing toolbar. Your default font should be Arial, as shown in the screenshot below.
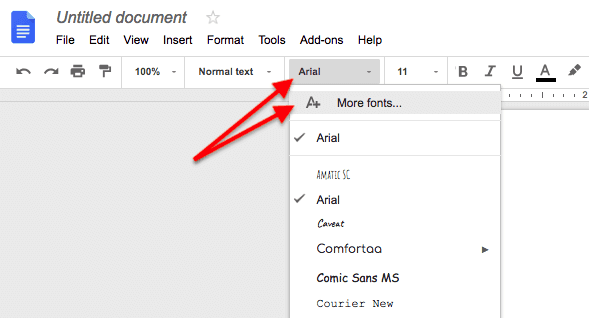
When your starting font list appears, click the "More fonts..." option -- the first option down, as shown in the screenshot above. This will open a window of additional fonts, as shown below.
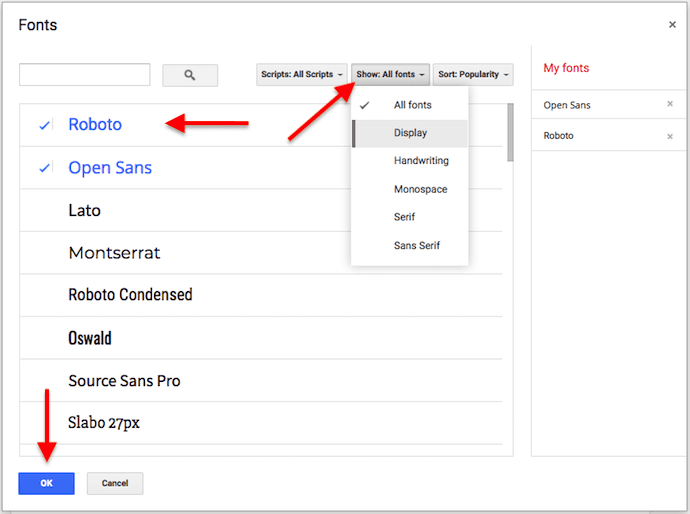
From the window that appears, shown above, check off the fonts you want to add to your starting dropdown list of fonts. Then select "OK" at the bottom. You can even explore new fonts by their general theme and appearance using the "Show" dropdown.
When you return to your document view, you should see your selected fonts included in the fonts dropdown.
2. Templates
Why start from scratch when you could use a template? Whether you're using Google Docs to write your resume, draft a project proposal, craft a business letter, formalize meeting notes, or design a brochure, you can bet there's a template for that. In fact, there are templates for almost all your business needs. And for every category, you'll find multiple templates to choose from.
This feature isn't exactly hidden, but it's often overlooked. You'll find all these templates at the top of your Google Doc homepage. Click More at the top right to browse through all the options.

3. Table of Contents Sidebar
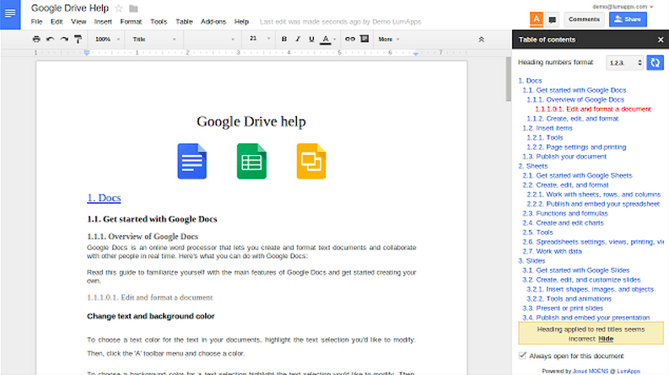
Writing a long document with a lot of subsections that readers may want to jump to? The handy "Table of Contents" add-on automatically creates a navigation sidebar. Simply click through the headers and subheaders in the sidebar to easily jump from place to place in your document. It can be a little slow if your document's really long, but it does the trick -- and it's still better than scrolling.
To find the add-on, click here or open your document and click Add-ons from the menu at the top of the page. Choose Get add-ons... and search for "Table of Contents."
4. Create or Remove Header
Headers and footers are particularly useful when creating a Google Doc that has many pages. You can create a header that includes the document title, each page number, or both on every page all at once.
To Create a Header
To create a header on Google Docs, double-click on the very top of one of your pages and begin typing your header text. You can also select "Insert" from the top navigation toolbar, then hover your cursor over "Header & page number" for a slide-out option that allows you to order your pages by increasing numerals.
Using either process, you'll create a header that looks like the screenshot below. This will appear on every page.

To Remove a Header
But removing this header once you've created it isn't as obvious of an option. To remove a header from Google Docs, simply remove the text included in the header, then click out of the header space and back into the document's body text.
To Change the Header Size
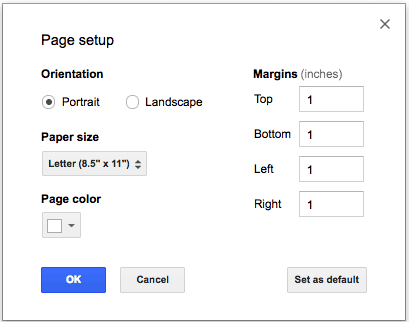
To shrink the size of a header from a Google Doc and use this space for more body text, change the margins of the page. To do so, click "File" in your top navigation bar, then "page setup..."
From here, you can narrow the page margins to a custom size, or using a preset "Paper size" from the options shown in the screenshot below. This will enable you to pull in or push out the header margins to your liking.
5. Clear Formatting
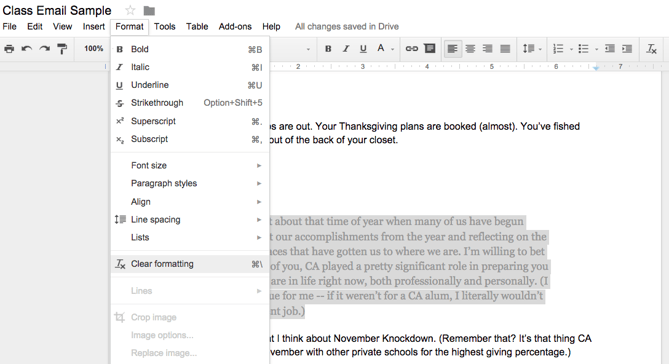
If you've ever pasted text into a Google Doc from another location, you've probably encountered formatting issues. It can happen for a variety of other reasons, too. Instead of editing that text manually to fit into the correct formatting, you can simply highlight the offending text and go to Format > Clear Formatting right in the toolbar. Boom: It'll format the foreign text to fit with the rest of your document.
6. Create a Folder
Because Google Drive stores your documents on the cloud, multiple people often use the same Drive account for sharing files with one another. Over time, this can make it difficult to organize your own documents. To store them all in a neat, safe place, make a Google Docs folder just for you or your team.
To create a new folder for your Google Docs, select the blue "New" button on the top left of your Drive account. This is also where you go to create a Google Doc, as shown below.
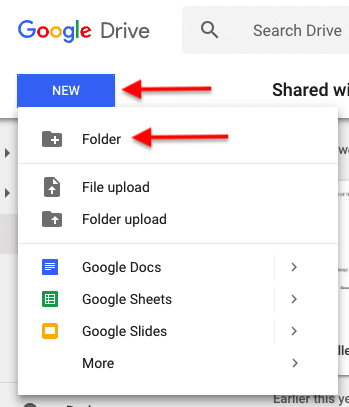
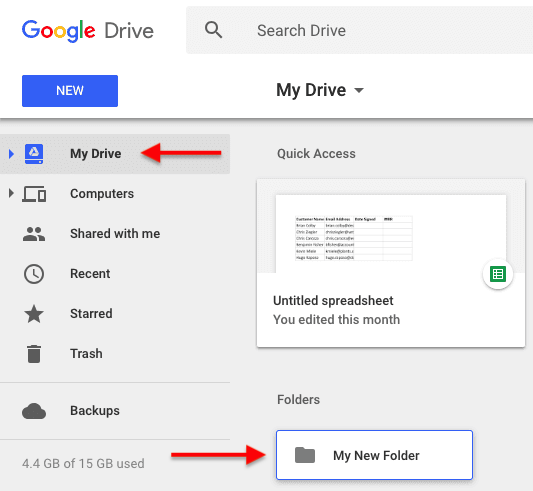
From the options that appear, select "Folder" and title your folder with a label you'll remember. This folder will then appear under the "Folders" section of "My Drive," as shown below.
7. The Research Tool
The Research tool is a godsend for anyone writing something in Google Docs that requires online research. Why? It allows you to research and refer to information and images online without every having to leave the document. That means no more clicking back and forth endlessly between tabs.
You can open the Research tool on a computer in one of three ways:
- Open your document and open the Tools menu at the top of your screen, then click Research from the dropdown menu.
- Right-click on a specific word and select Research.
- Use the keyboard shortcut Ctrl + Cmd + Shift + I (Mac) or Ctrl + Alt + Shift + I (PC).
Here's what it looks like when I right-click the phrase "Welsh corgi" in my document:
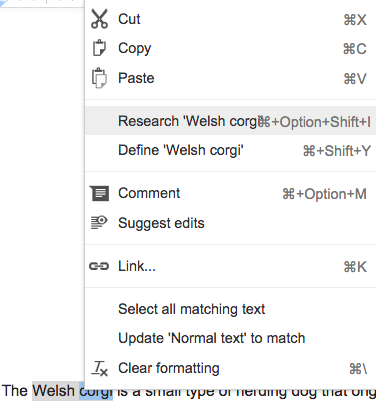
When I choose "Research 'Welsh Corgi,'" the Research tool appears on the right-hand side of my document. It looks like this:
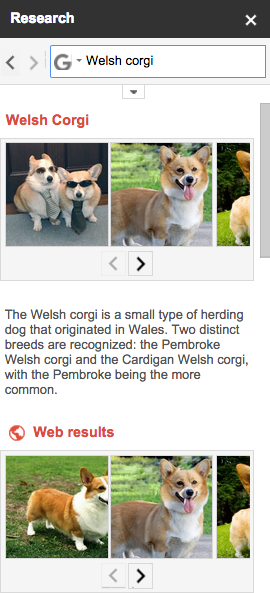
When you first open the Research tool, it might show you topics related to what it thinks you're working on based on what you've written already. You can either research those suggested topics by clicking on them, or you can type in your own search terms in the search bar.
You can also choose what type of content you want the tool to spit back when you search a term. Use the dropdown menu next to the search bar to see the different types of information for that topic.
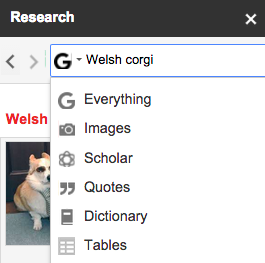
Here's what each type means, according to Google Support:
- Everything: Text and images related to your topic from any source.
- Images: Images related to your topic found on the web.
- Scholar: Educational information related to your topic that you can read, add to your file, or cite in a footnote.
- Quotes: Quotes related to your topic that you can add to your file.
- Dictionary: Definitions, synonyms, and antonyms related to your topic.
- Personal: Results from your personal documents, spreadsheets, presentations, and photos that you can open, cite, or link to from your file.
- Tables: Data presented in tables related to your topic that you can open, cite, or export.
Right now, the Research tool is only available on computers and Android mobile devices. (Learn how to use the tool on Android devices here.)
8. Suggesting Mode
While the capability to edit and make changes in a document is great, there are times when you only want to suggest changes -- without actually making any. That's where "Suggesting" mode in Google Docs comes in handy.
It works a lot like Comments in Microsoft Word. First, switch from "Editing" mode to "Suggesting" mode by clicking the pencil icon at the top right of an open document, and then choosing "Suggesting."
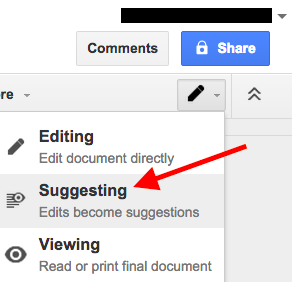
From there, anything you add, delete, or otherwise change will show up as colored marks in the document, accompanied by details on the righthand side such as the name of the suggestor and a timestamp.
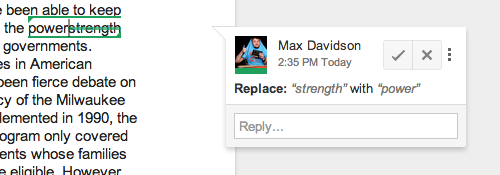
Image Credit: Google Support
9. Comments
If you want to ask questions about, make notes in, or highlight changes you've made in a Google Doc you're working on, you can leave comments directly in the document. The comments can act as a conversation thread, as people can reply to them and carry on a conversation. You can close the comment thread when it's done. You can also edit or delete your comments at any time, or others' comments if you own the document.
To add a comment, highlight the text or image you'd like to comment on. Then, choose Insert from the menu at the top of your screen, and choose Comment from the dropdown menu.
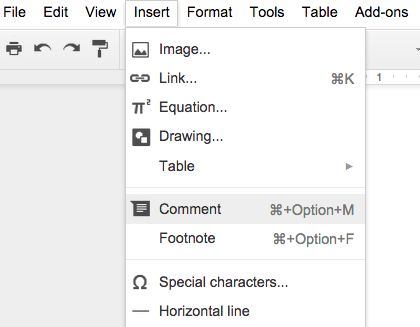
From there, a blank comment will appear on the right-hand side of your screen.
Tag People in Comments
Want to comment on a document and get a specific person's attention? You can do that by tagging them in your comment. All you have to do is add an @ or a + sign, and then begin typing their name or email address. Google Docs will give you a couple options based on your Gmail contacts, and once you've submitted the comment, it'll notify that person you mentioned by sending them an email.
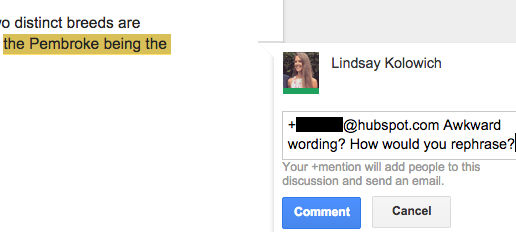
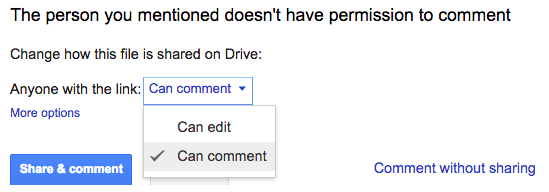
If that person doesn't already have access to the document, you'll be asked to choose permission levels for them.
10. Footnotes
Footnotes are quick and easy things to add to your Google Docs, but not many people know about them. To add a footnote, put the cursor in the part of the document you want the footnote to appear, and go to Insert > Footnote. From there, simply type in to your footnote whatever you'd like, and click onto the document to save it.
11. Find and Replace
Did you ever want to locate multiple instances of an error in a text document and correct them all at the same time? Google has heeded your call with this nifty shortcut.
If you've ever used "Find and Replace" in Microsoft Word, you're in luck: Google Docs makes it just as easy.
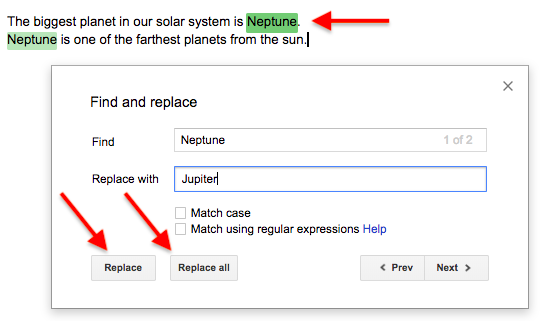
To find something specific in your document, select "Edit" in your top navigation bar and click "Find and replace" at the bottom of the dropdown menu. You can also type Command + F on an Apple keyboard (or Ctrl + F on a Windows keyboard), then click the "..." icon in the box that appears to the top right of your Google Doc.
Either process will call up the window shown below, where you can type in the text you'd like to find and replace it with corrected text. If the error appears more than once, click "Replace all."
12. Revision History
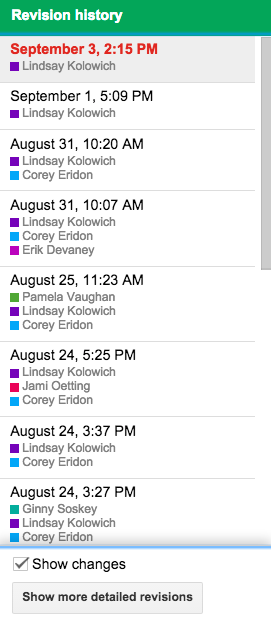
Speaking of revising content ... have you ever wanted to see all of the changes you (or someone else) made in a Google Doc? Better yet, have you ever wanted to go back in time and revert to an earlier version of your document? Thanks to the Revision History feature, you can. And it's awesome.
All you have to do is open the document and go to File > View Revision History. A panel will appear on the right-hand side of your screen showing an overview of who made changes and when. For a more in-depth view of the changes that were made, click the detailed revisions button below the overview list.
13. Voice Typing
Have Google Chrome as your browser? Have a working microphone either built in to your device or connected externally? Then you can "type" in a Google Doc using just your voice. To indicate a punctuation mark, simply say the name of it out loud, like "period," "comma," "exclamation point," or "question mark." To begin a new line or a new paragraph, say "new line" or "new paragraph" out loud.
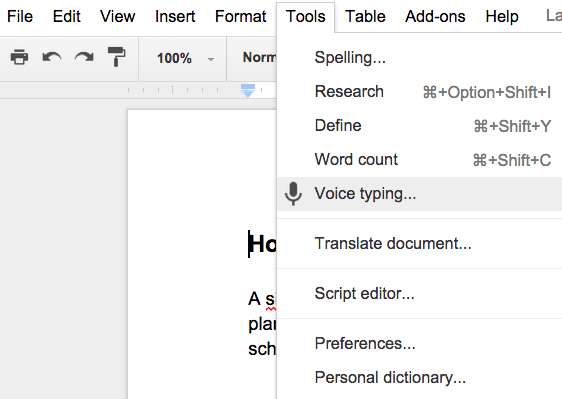
To get to voice typing, open a document and click Tools from the menu at the top of the page. Choose Voice typing... from the dropdown menu. When you're ready to speak your text, click the microphone or press Cmd + Shift + S (on a Mac) or Ctrl + Shift + S (on a PC) to begin recording.
Want to voice type in Google Docs on your phone? Voice typing only works for computers, but many iOS and Android mobile devices have built-in microphones you can use with a document.
14. Keyboard Shortcuts
There's something so satisfying about knowing the keyboard shortcuts for whatever application you're using, and Google Docs has a ton of them to choose from. A lot of them are the same as in other applications, such as Cmd + C (Mac) or Ctrl + C (PC) to paste, or Cmd + B (Mac) or Ctrl + B (PC) to bold something. But it has a few unique ones, too. Here are a few of my favorites:
- Shift + T = Create a new document.
- Ctrl + Alt + M = Insert a comment.
- Alt + I (in Google Chrome) or Alt + Shift + I (in other browsers) = Open the "Insert" menu.
- Hold Ctrl + Alt, press N then H = Move to the next heading.
To display the list of commonly used shortcuts while you're working in a document, press Cmd + / on a Mac, and Shift + / or Ctrl + / on Chrome OS or Windows. You can also just click the gear icon in the upper left hand corner of your screen and choose "Keyboard Shortcuts" from the dropdown menu.
15. Create Your Own Shortcuts
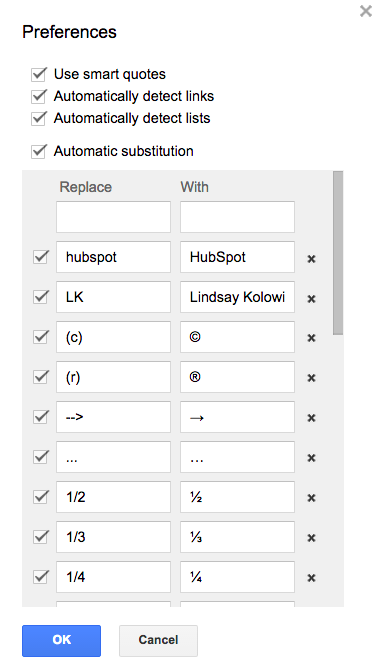
Google Docs may have a lot of shortcuts available to us, but what if we want to make a few of our very own? To create custom shortcuts, go to Tools > Preferences > Automatic Substition. You might find there are a few in there already (like changing 1/2 to ½), but feel free to add in some of your own.
16. Conference Calls
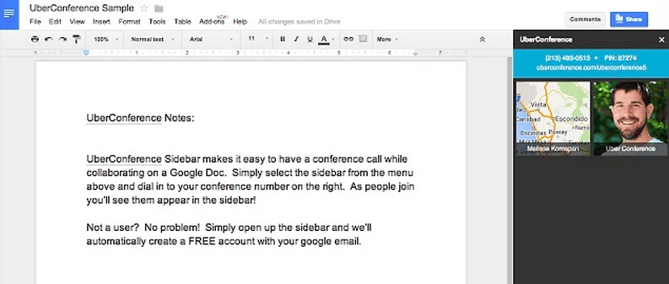
Google Docs is a collaborative platform -- and the "UberConference" add-on makes it even more collaborative by letting you conduct an audio conference call right from the document. All you have to do is turn on the add-on and invite your friends or colleagues. When they accept, everyone will be able to view and edit the document while participating in a conference call.
To find the add-on, click here or open your document and click Add-ons from the menu at the top of the page. Choose Get add-ons... and search for "UberConference."
17. Image Editing
Once you've inserted an image into your document, you can still edit it within the document. Click the image in your document, and the toolbar at the top will change to all the tools you can use to edit your image. Crop it, mask it, add borders to it ... there are a lot of possibilities in there.
Below are two examples of great image editing tricks: cropping and adding a border. (And if you ever want to reset an image back to its original form, simply select the image and click the "Reset Image" icon in your toolbar.)
Cropping Tool
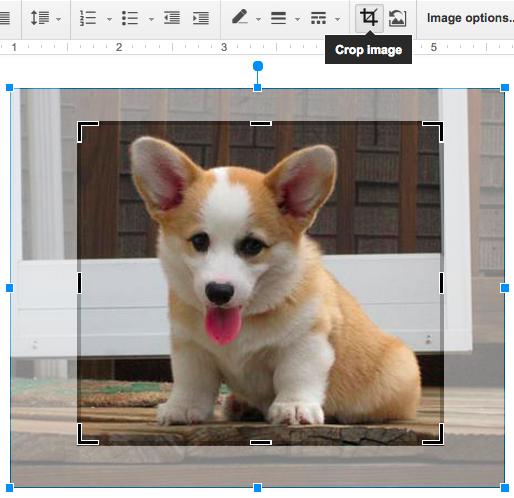
Select an image in your document and click the crop icon in your toolbar. From there, drag and drop the blue handles until you've cropped the image to your liking. To save it, click "Enter" on your keyboard or just click back into your document.
Borders
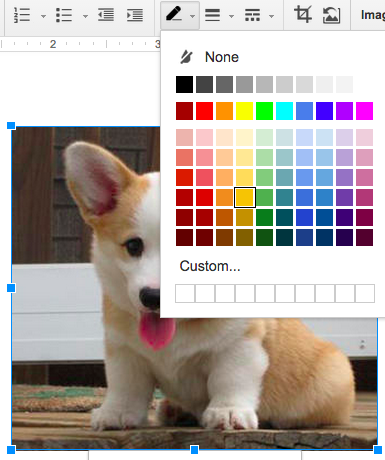
To add a black or colored border to any image, select the image and click the line color icon in your toolbar (which looks like a pencil). Select the color you want the border to be, and voilà! To save it, simply click off of the image.

18. Dictionary
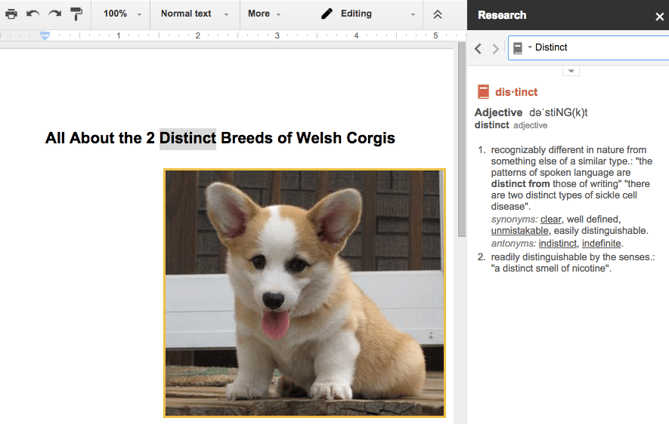
Ever written a word and wanted to double-check you're using it correctly? What about writing a word that you want to find a synonym for? Instead of opening up a new browser window, you can look up the definition for that word right inside your document -- as well as get synonym suggestions.
All you have to do is highlight the word, right-click on it, and choose Define. The Research tool will look up the word on the internet for you, and its definition will appear on the right-hand side of your screen.
19. Language Accent Buttons
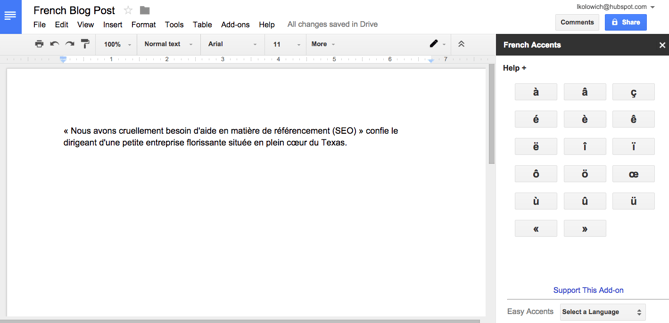
Gone are the days of memorizing accent shortcuts (and getting them wrong), opening up international keyboards and clicking keys manually, and copy/pasting from other documents. If you ever find yourself writing in a language other than English, the "Easy Accents" add-on could save you a lot of time. It lets you insert accents for 20 different languages directly from a sidebar in your document.
To find the add-on, click here or open your document and click Add-ons from the menu at the top of the page. Choose Get add-ons... and search for "Easy Accents."
20. Add a New Page
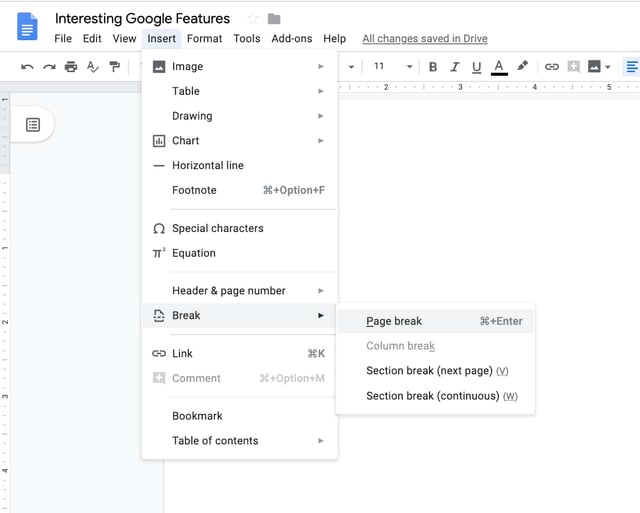
If your Google Doc doesn't automatically add new pages, you can add your own. To do this, scroll down, click and place your cursor where you'd like the page to break. Then go to Insert, click Break, and then Page Break. You'll see one page end and another begin.
 21. Insert Today's Date
Unfortunately, there isn't a quick way to insert the date into a Google document. You'll need to use the document's Script Editor for this. Luckily, there are a number of pre-created codes online that you can insert into the Script Editor to make "Insert Date" pop up on the page's settings. Here's one code from Quora, and another from SlackExchange.
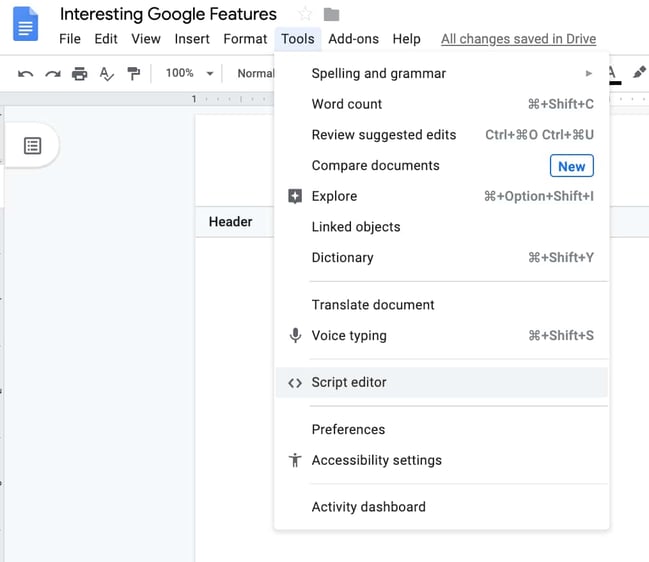
To begin the process, go into your document, click Tools and then click on Script Editor.
You'll be brought to a page where you can paste in script. Once the script you've chosen is inserted and you've saved your work, you should be able to refresh your document and see a new button on the tool bar with new items to insert, including the date. 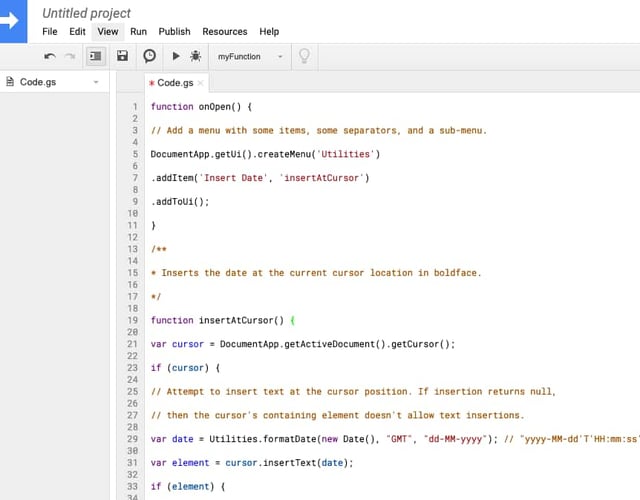
Keep in mind that this button might have different options depending on the code you choose. While some codes may just ass an "Insert Date" button to your toolbar, others might add a button that says something like "Utilities" or "More Tools."
For those who aren't super into coding, it might be less time consuming to just insert the date manually, or type it in a header so it appears on all pages.
More Ways to Work With Google
I'll bet you didn't know at least a handful of these ... Now that you do, put them to good use in your next Google Doc. Want more ways to use Google to create an effective marketing campaign? Download the free guide below.
from Marketing https://ift.tt/2uvOt3e
via
No comments:
Post a Comment