Wednesday 30 June 2021

What Does it Mean to Use Concatenate in Excel [+ Why It Matters]

Copy and paste shortcuts are handy until you have hundreds of data points to manually combine and reformat.

Fortunately, you can use the CONCATENATE Excel function to save time (and curb carpal tunnel) when joining information from cells, rows, or columns.

Meaning "to join together" or "to combine," concatenate is a way to unite the contents of two or more cells into one cell.

The function allows you to combine data from columns, cells, ranges, and rows into whatever format you desire, making it easy to quickly join names and addresses or properly display dates and times.

There are various ways to set up the CONCATENATE formula in Excel, so we'll walk through the steps required to use this function and achieve your worksheet goals.

Download 9 Excel Templates for Marketers [Free Kit]

How to Concatenate in Excel

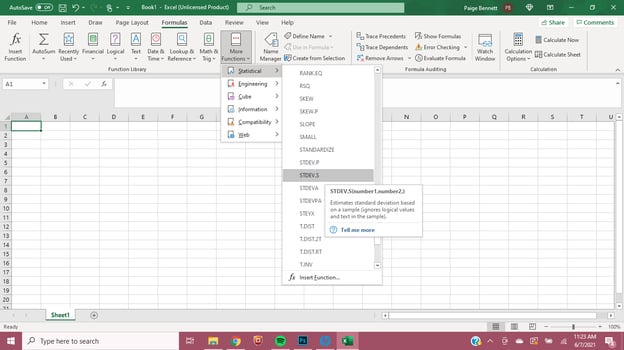
While there are several ways to combine text in Excel worksheets, we'll be focusing on the CONCATENATE function.

It combines the contents of two or more cells into one cell without physically changing the shape of the cell and is often used to join pieces of text (called text strings or strings) from individual cells into one cell. The resulting text string is the combination of all strings in your CONCATENATE formula.

Here's a look at how to concatenate in Excel:

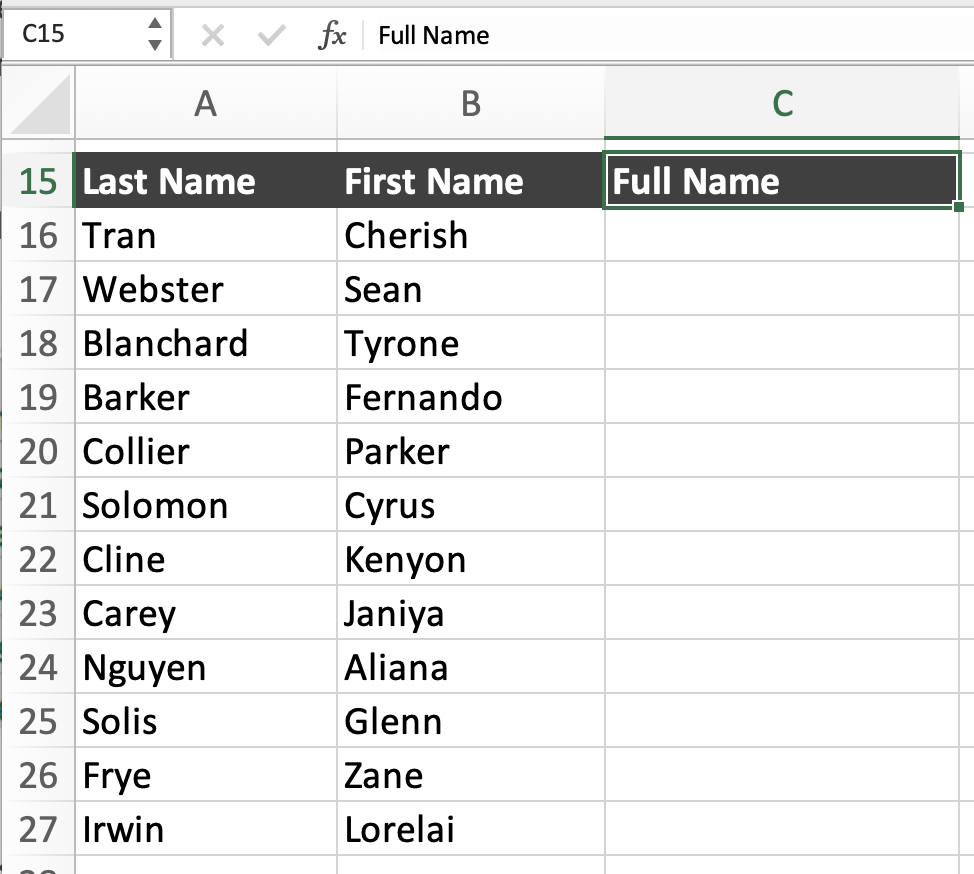
Let's say you have a list of customers whose first and last names are separate. You need everyone's full names to build a retargeting campaign, so you want to join text from column A (First Name) with the text from column B (Last Name).

Before using the CONCATENATE function, you have to create a new column for your combined text. In the example below, it's column C (Full Name).

Source

Now, you're ready to concatenate the first and last names. To do that, you need to understand both the syntax of the function and how to format the text strings that make up the formula.

Excel Concatenate Formula

Like all Excel functions, the CONCATENATE formula starts with the equals sign (=), followed by the function name, an open parenthesis, and the text arguments. No need to get heated – in this context, arguments simply tell the formula what cells to combine.

=CONCATENATE(text1, [text2], ...)

=CONCAT(text1, [text2], ...)

text1: This is the first argument to join and can be a number, text, or cell reference.

text2, text3, etc: These are the additional items to combine. The CONCATENATE formula can join up to 255 items, with a total of 8,192 characters.

Note: In all versions of Excel 2016 and beyond, the CONCATENATE function has been replaced with the CONCAT function. This function works in the exact same way, with the added ability to combine text over a range of cells (i.e., =CONCAT(A2:D8)). While you can still access the CONCATENATE function for compatibility reasons, Microsoft warns that CONCATENATE may not be available in future versions of Excel.

Excel Concatenate with Space

Double quotations (" ") include a space between the text arguments wherever you want one to appear. Just remember to insert a comma before and after each set of quotations or else an error message will pop up and the formula won't run. You'll know your formula is correct if you hit "Enter" and the new text string appears exactly how you want.

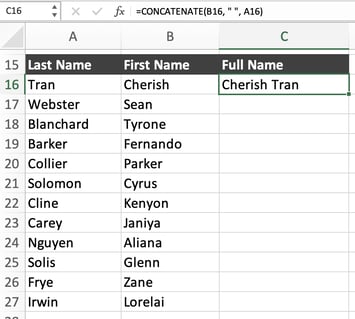
In the name example, you want to combine the text in cells A16 and B16, so add those arguments to the formula. Make sure to place the arguments in the order you want them to appear. To get "First Name Last Name," set up the CONCATENATE formula like this:

=CONCATENATE((B16, " ", A16)

Note: If at least one of the CONCATENATE function's arguments is invalid, the formula will return a #VALUE! Error.

Source

Now it's time to apply the CONCATENATE formula to every name in the list. Simply hover over the combined cell until a plus sign (+) appears in the bottom right-hand corner. Then click and hold while dragging the cursor down column C, highlighting all of the cells you want to join.

Source

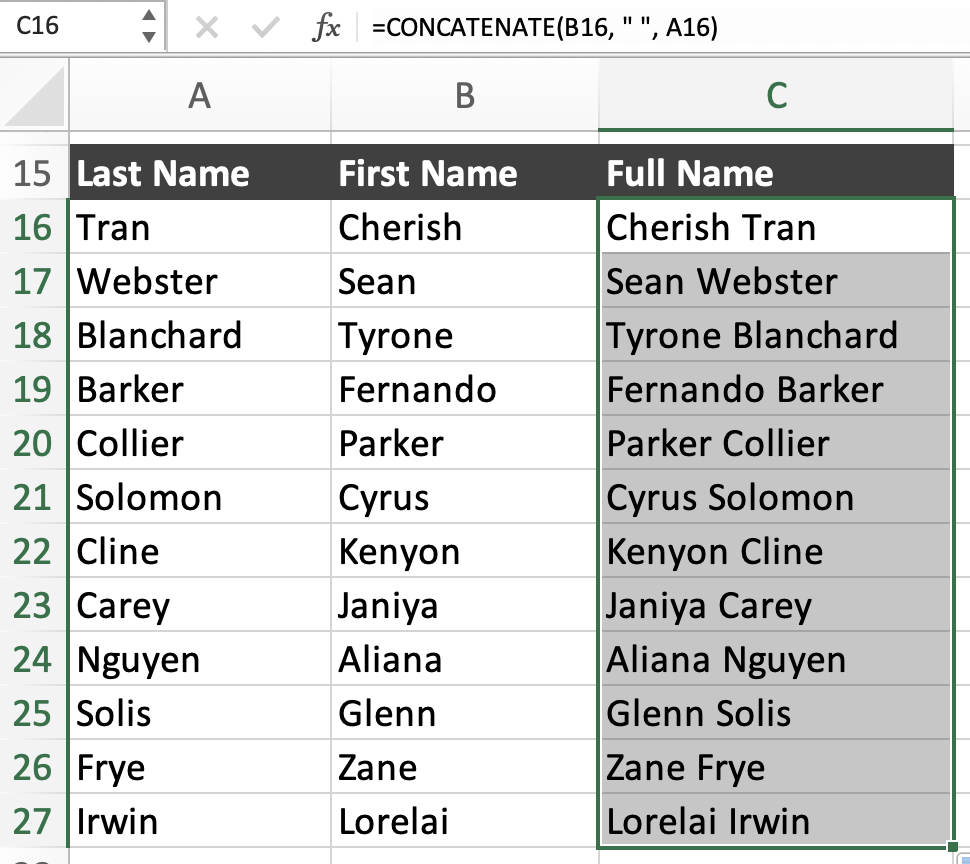
When you release the cursor, voila! The formula is applied to each cell. This prevents you from having to type out the formula for each cell by letting you concatenate dozens of text strings in an instant.

Excel Concatenate Strings

Whether you combine text and numbers, the result of the CONCATENATE function is always a text string. The naming example above is a fairly simple example, but it's possible to create longer, more meaningful text strings in Excel. The key to doing so is to ensure your results provide value to whoever is using the information.

Let's say you're working on an email campaign and want to personalize the subject line with each customer's name. Instead of manually typing out name after name, you can use the CONCATENATE function to combine the text strings. For this example, I used a catchy email subject line from Warby Parker.

Source

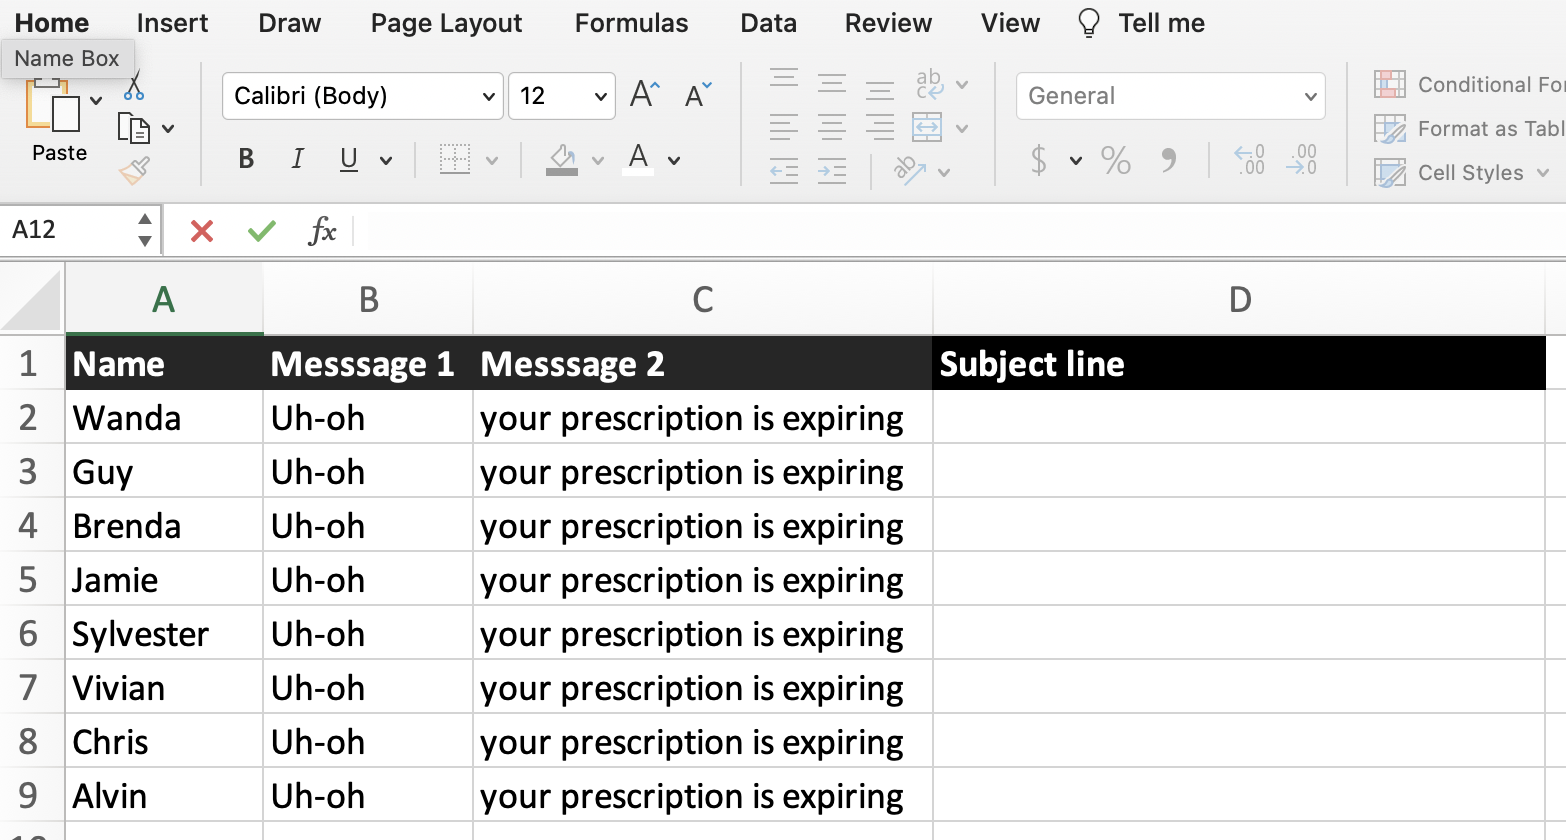
I write the following formula, making sure to include commas and spaces where I want them to appear.

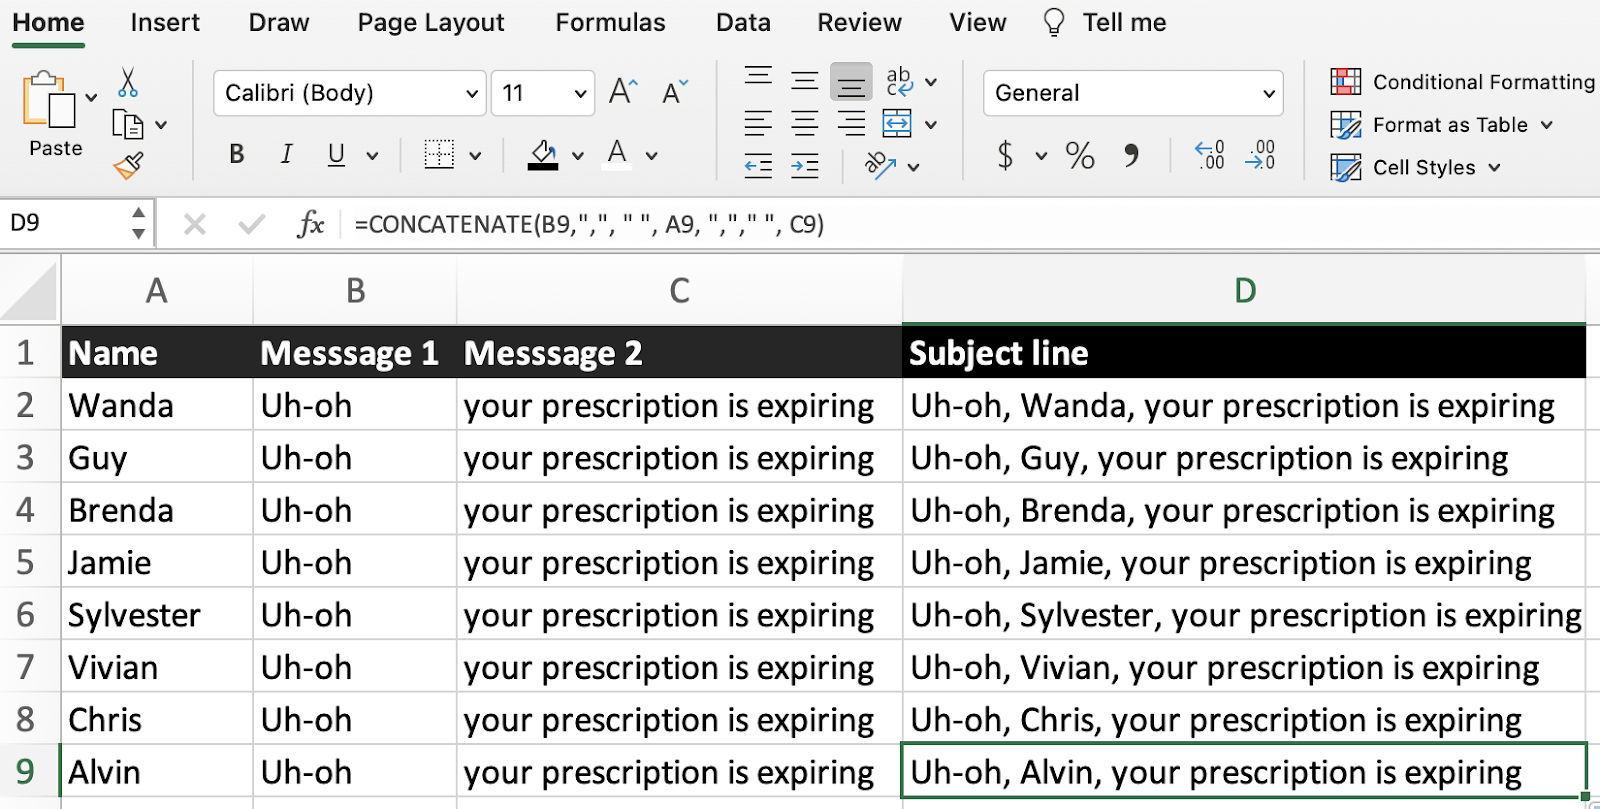
=CONCATENATE(B2," ,", A2, ","," ", C2)

Source

I then apply the formula to the entire column to generate my list of personalized subject lines.

Source

As you experiment with longer text strings, know that every cell reference in the CONCATENATE function must be listed separately because it can't recognize arrays. For instance, your formula should look like =CONCATENATE (B1, B2, B3, B4) rather than =CONCATENATE(B1:B4).

Combining text is simple enough, but throwing dates and times into the mix can result in a messy formula and error-ridden results.

Concatenate Date and Time in Excel

You can prevent issues with time and dates by embedding the TEXT function into the CONCATENATE Excel formula. This will let you control the formatting when combining text with a number or a date.

Let's look at how to combine all of this information. In this worksheet, I want to record the date and time each blog post went live so I can reference the information during my monthly performance analysis.

Source

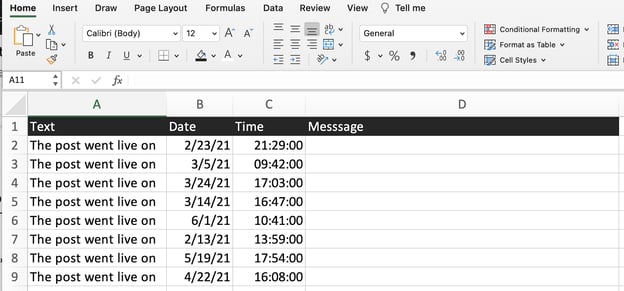
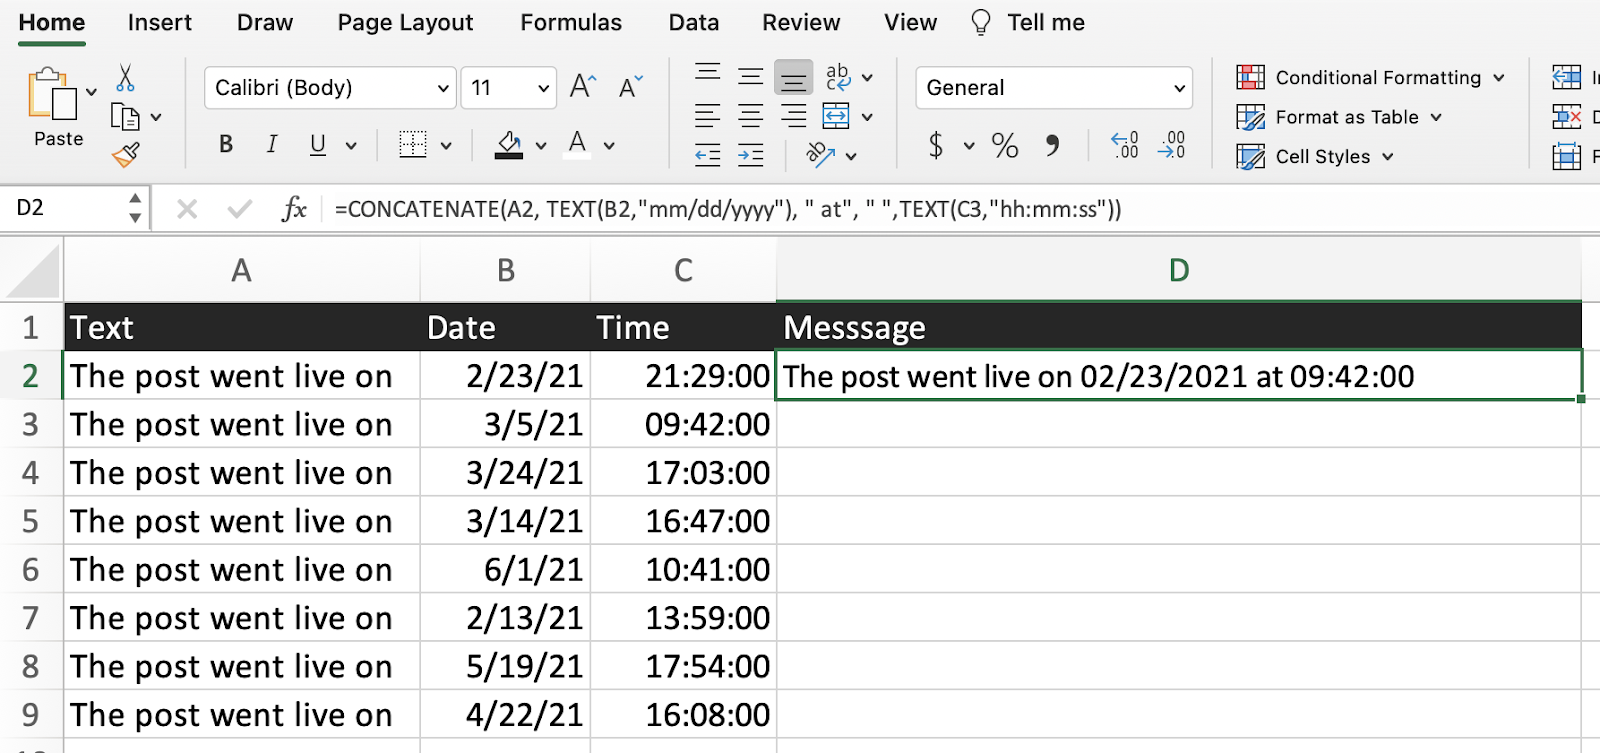
The formula needed to join these three strings may look complicated, but it's simple once you decide how to format the date and time. I want to leave the dates and times as they are, so I include the date (mm/dd/yyyy) and time (hh:mm:ss) formatting into the CONCATENATE formula.

=CONCATENATE(A2, TEXT(B2,"mm/dd/yyyy"), " at", " ",TEXT(C3,"hh:mm:ss"))

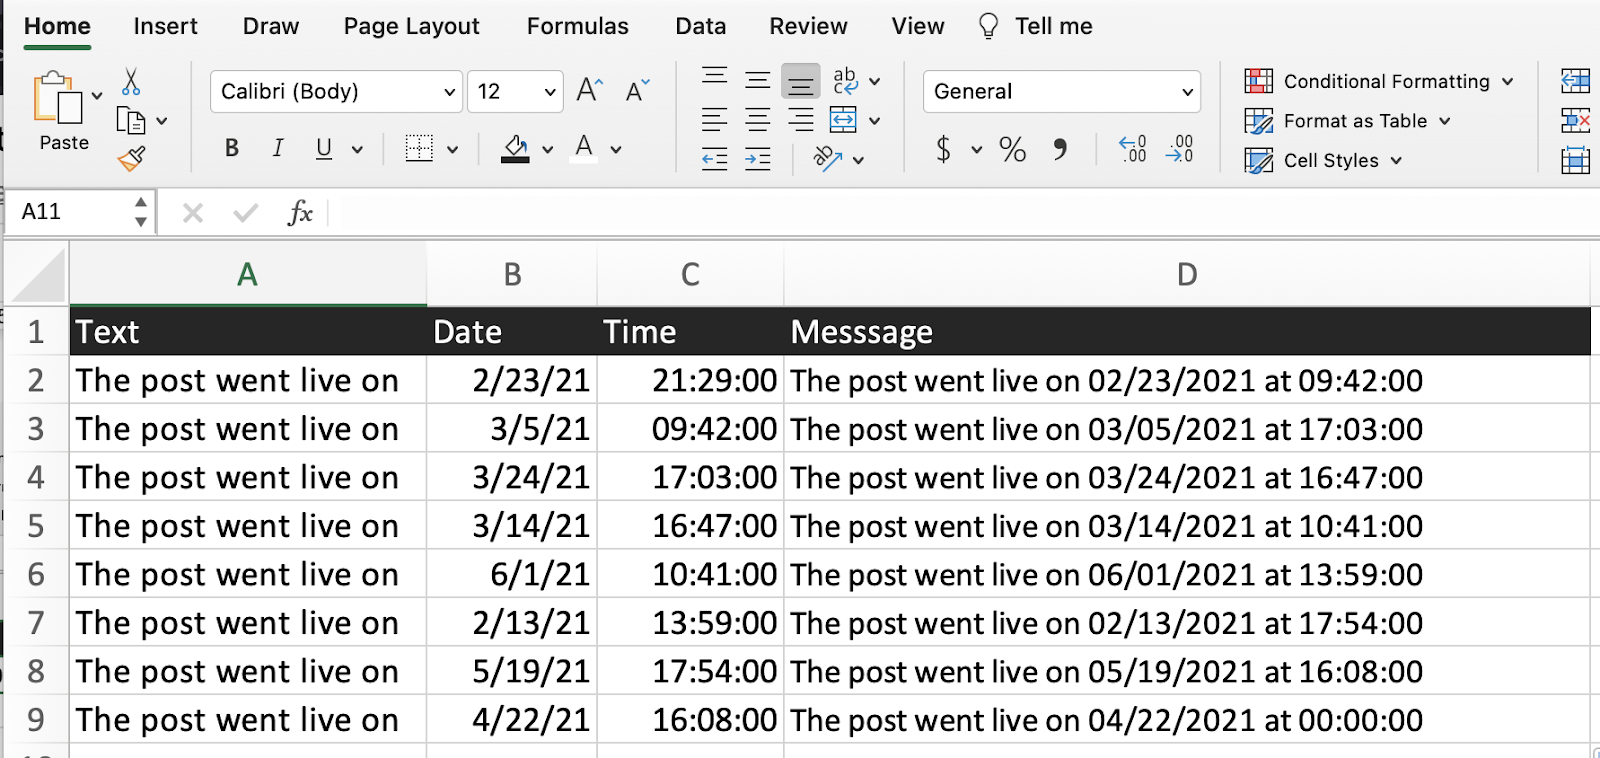
The result is a text string that provides meaningful context by sharing what date and time the posts went live.

Source

Apply the function to the rest of the worksheet using the same steps as before. Drag the plus (+) sign in the bottom right-hand corner of the combined cell down the column, highlighting the cells you want to concatenate.

Source

Excel Concatenate Range

If you're excited about your new Excel skills, you may have the urge to jump in and organize worksheets with thousands of data points. Using the CONCATENATE function can speed up your work, but know that there are limitations.

Excel only allows you to combine 255 items, up to a total of 8,192 characters, using the CONCATENATE function. So you have to work in sections if you want to create hundreds (or thousands) of new text strings.

The CONCATENATE function doesn't accept arrays (A3:E5), so make sure to list out each argument you want to include in the formula. If you need to combine a massive range of tens or hundreds of cells, try out one of these shortcuts.

Use the CONTROL key.

  1. Type in the first part of your formula =CONCATENATE(
  2. Hold down the CONTROL key and select the individual cells you want to combine.
  3. Release the CONTROL key, type a closing parenthesis, and hit ENTER.

Use the TRANSPOSE function.

If you need to combine hundreds of cells, you don't want to waste time clicking on each cell. Instead, use the TRANSPOSE function to create an array before swapping it out with the individual cells.

  1. Select the cell you want to use the CONCATENATE function.
  2. Type in the TRANSPOSE formula to generate an array of cells. It will look similar to this: =TRANSPOSE(A1:A10)
  3. With the TRANSPOSE cell selected, press the F9 key in the formula bar to replace the array with the individual values to be concatenated.
  4. Delete the brackets around the values so you're left with only a list.
  5. Enter the CONCATENATE formula before the values, and close the formula with a parenthesis.
  6. Hit enter to see your new text string.

While certain heavy Excel users say the CONCATENATE function is becoming outdated, it's still a useful shortcut for combining text strings without impacting the rest of your worksheet. If you're new to the program, take the time to learn more about how to use Excel and check out these helpful keyboard shortcuts. You'll be whizzing your way around worksheets and working more efficiently in no time.

New Call-to-Action


from Marketing https://ift.tt/3hf2b08
via

How to Calculate Standard Deviation in Excel, and Why It Matters for Marketers

If you’ve ever taken a statistics class, the words ‘standard deviation’ might intimidate you. This complex formula provides insightful information for datasets that averages alone cannot reveal, and thankfully, Excel makes calculating this statistic easier than putting pencil to paper.

Standard deviation is frequently used by financial professionals as it can help determine risks in stock portfolios and is often applied to return on investment (ROI).

For marketing professionals, standard deviation can reveal variabilities and risks in datasets that will ultimately help guide campaign decisions.

What is standard deviation?

Simply put, standard deviation is a mathematical term that measures the variation in a set of values. In marketing, standard deviation can help account for widely varying costs or sales. If the numbers in a data set are spread far apart, they have a higher standard deviation.

This measurement can help assess risk when deciding how much budget can be allocated toward certain campaigns based on the standard deviation of the ROI, just to name one example.

How to Calculate Standard Deviation in Excel

There are six standard deviation formulas in Excel, which will be used based on whether you need to calculate sample standard deviation or population standard deviation. This is easy to identify in Excel, as the three formulas for population standard deviation include a P (.P, PA, or P at the end of STDEV).

  1. STDEV.S
  2. STDEVA
  3. STDEV
  4. STDEV.P, STDEVPA, STDEVP

STDEV.S

If you are dealing with sample standard deviation and do not need to account for text or logical values, STDEV.S is the formula you will use to calculate standard deviation in Excel.

STDEVA

Alternatively, if you do need to account for text and logical values, use STDEVA, which will consider text and FALSE logical values to 0, while TRUE logical values will be read as 1.

STDEV

STDEV is simply the sample standard deviation formula that will work with older forms of Excel (2007 and before). It is the same as STDEV.S.

STDEVP, STDEVPA, STDEVP

You will almost exclusively use STDEV.S, STDEVA, or STDEV. When determining population standard deviation, you would have to include all datasets for the entirety of the population.

This can actually be far more data and much less useful than examining a smaller portion of the data, or a sample, in which case you would use one of the sample standard deviation formulas.

If you did, for some reason, need to determine the population standard deviation, you could still retrieve sample standard deviations and apply them to the larger dataset. The likelihood of needing these population standard deviation formulas is slim.

As stated by Microsoft, “[STDEVP] has been replaced with one or more new functions that may provide improved accuracy and with names that better reflect their usage. Although this function is still available for backward compatibility, you should consider using the new functions from now on, because this function may not be available in future versions of Excel.”

Sample of Standard Deviation in Excel

STDEV.S, STDEVA, or STDEV will be the most common formulas to use for marketers looking to calculate sample standard deviation in Excel.

These formulas specifically calculate standard deviation for a sample of a dataset, so the result will determine the amount of variability from the average (mean) of the data.

Next, we will determine how to find and use standard deviation formulas in an Excel spreadsheet.

Standard Deviation Excel Formula

As mentioned above, there are a total of six standard deviation Excel formulas, although you’ll only need one or two of them (depending on the version of Excel you use).

The syntax of the standard deviation formula in Excel for STDEV.S is

STDEV.S(number1,[number2],...)

Number1 is required and refers to “The first number argument corresponding to a sample of a population. You can also use a single array or a reference to an array instead of arguments separated by commas,” as explained by Microsoft.

Number2, … is optional. You can include up to 254 number arguments that refer to sample sets or data of a population, or you can use an array or reference to an array instead of number arguments.

This is the STDEV.S formula used by Excel:

x is the sample mean AVERAGE(number1,number2,…) and n is the sample size. Excel thankfully makes light work of applying this formula to data to calculate standard deviation.

Image via Paige Bennett

Excel Standard Deviation Function

How does one find the Excel standard deviation function that they need? In Excel, navigate to the “Formulas'' header in the topmost navigation bar. For Excel versions after 2007, the second navigation bar offers a list of popular formulas, and at the end, “More Functions.” Click “More Functions” then “Statistical” and finally scroll down to the STDEV.S or other standard deviation formula for which you need. You can then input Number1 and Number2, ….

Those using an older version of Excel will not have the STDEV.S formula, but they will similarly be able to navigate to STDEV.

Why Standard Deviation is Important to Marketers

Perhaps this seems simple to some marketing professionals, or maybe this is a lot of statistical speak that sounds complex. Either way, mastering this formula and Excel function is crucial for marketers.

In marketing, discussing averages for datasets is commonplace, and this can be insightful. But it can also leave out some crucial information that could impact a campaign.

Standard deviation can show risks, volatility, or variability in a dataset. An average might show a promising campaign to allocate money toward, but standard deviation can show the potential risk and reward of a campaign. Together, averages and standard deviations can offer a comprehensive look at a dataset, so marketers can make the best decisions based on all of the information at hand.

For example, let’s say we have two companies with different order averages.

Company one has an order average of $1,000. Company two has an order average of $1,500.

But Company two has a standard deviation of $500, while Company one has a standard deviation of $50. Company two has a higher order average on the surface, but a deeper dive shows that it is riskier.

Standard Deviation Can Help Marketers Assess Risk

Averages can be meaningful in showing marketers promising campaigns and to forecast their results. But what averages don’t show are the risk and variability within the data.

A higher average sales number might not show a huge range of variability, and ultimately, risk. While standard deviation has long been used in finance to assess risk of stock portfolios and help professionals determine where to invest or what to expect for ROI, marketers can also benefit from using this statistical analysis in their own work.

They just might find some profitable surprises and avoid risky, volatile campaigns or companies by looking at both averages and standard deviation when making decisions.


from Marketing https://ift.tt/3y4pZus
via

Reach, compel, convert — attend SMX Convert for just $99

Grab your All Access pass now and join us online on August 17!

Please visit Search Engine Land for the full article.


from Search Engine Land: News & Info About SEO, PPC, SEM, Search Engines & Search Marketing https://ift.tt/3hiN1r2
via

Sitemaps: What They Are, How to Create One & Submit it to Google

Sitemaps are one of SEO's oldies but goodies.

In fact, they're one of the most important elements of SEO, because they help Google and other search engines find the pages on your website.

Not to mention they also help you rank better, because Google is able to locate new pages and identify updates to old pages much more quickly.

In a nutshell: you can't live without 'em.

I've often heard that they can feel overwhelming and quite technical to understand.

But don't let the frustration of their technicality make you throw your computer out the window — I've got your back!

I will show you what sitemaps are, how to create one, how to submit them to Google, and all the essential best practices.

→ Download Now: SEO Starter Pack [Free Kit]

What is a sitemap?

To start off with the basics, a sitemap is a file that provides information about the pages, videos, images, and other files on your website. It's important for various reasons, including:

  • Acting as a roadmap for Google and other search engines to find and better understand your content.
  • Leading search engines through your website to crawl and index the essential pages.
  • Helping search identify when new pages and updates to old pages are available.
  • Helping search engines find alternate language versions of your page.

But before I go further, you must know that there are two types of sitemap formats: HTML and XML. Here's the basic difference:

HTML sitemaps: This is more like your content sitemap that users can see and use to navigate your site. They're also commonly referred to as your "website archive." Some marketers view HTML sitemaps as outdated or even entirely unnecessary.

XML sitemaps: This is the sitemap that's purely used for indexing and crawling your website and is manually submitted. It's the more modern form of handling how all your content is stored across your website.

While HTML sitemaps might help users find pages on your site, as John Mueller said, your internal linking should take care of that anyways. So the focus from an SEO perspective should be on XML sitemaps.

Types of Sitemaps

From these two types of sitemaps described above, there are also subsections within them. I'll now go over these in more detail.

1. Page Sitemap

A page sitemap or regular sitemap improves the indexations of pages and posts. For sites that are not image-focused or video-focused, like photography and videography sites, a page sitemap can also include the images and videos on each page.

A page sitemap without an image would look like this:

<?xml version="1.0" encoding="utf-8"?>

<urlset xmlns="https://ift.tt/3jucoc7" >

  <url>

    <loc>https://ift.tt/2UUH8sv>

    <lastmod>2020-09-17</lastmod>

    <changefreq>daily</changefreq>

    <priority>0.9</priority>

   </url>

</urlset>

Include your URLs in <loc> tags. <lastmod> indicates when the page was last edited. <changefreq> indicates how often the page is edited and <priority> indicates how important the page is to other pages on the website as a whole. You can take a look at Sitemaps XML format for more information on these parameters.

2. Video Sitemap

An XML video sitemap is similar to a page sitemap, but of course focuses largely on video content, which means they are only necessary if videos are critical to your business. If they aren't, save your crawl budget (the finite amount of crawlable pages and resources across your site) and add the video link to your page sitemap.

But if you do need a video sitemap, it would look like this:

Note: This is what a video sitemap looks like. Implement it only if videos are critical to your business.

3. News Sitemap

If you publish news and want to get those news articles featured on top stories and Google News, you need a news sitemap. There's a crucial rule here: do not include articles that were published longer than the last two days in the file.

Google News sitemaps aren't favored in regular ranking results, so make sure you only add news articles. Also, they do not support image links, so Google recommends you use structured data to specify your article thumbnail.

4. Image Sitemap

Like the video sitemaps, image sitemaps are only necessary if images are critical to your business, such as a photography or stock photo site. If they aren't, you can leave them in your page sitemap and mark them up with the image object schema, and they will be crawled along with the page content/URL.

If you believe an image sitemap is needed, it will look like this:

<?xml version="1.0" encoding="utf-8"?>

<urlset xmlns="https://ift.tt/3jucoc7" xmlns:image="https://ift.tt/3AhSjLR" >

  <url>

    <loc>https://ift.tt/2UUH8sv>

       <image:image>

<image:loc>https://ift.tt/3yeUDlf>

       </image:image>

      <image:image>

<image:loc>https://ift.tt/3x7wJaV>

      </image:image>

  </url>

</urlset>

5. Sitemap Index

There are a few limitations you'll want to keep in mind for sitemaps:

  • Having too many URLs will only lead to no indexation of some of your pages.
  • All sitemaps, except the news sitemap, should have a maximum of 50,000 URLs.
  • News sitemaps should have a maximum of 1000 URLs.
  • A sitemap should be a maximum of 50MB in uncompressed file size.

As a result of those limitations, you might need to have more than one sitemap. When you use more than one sitemap file, you need an index file that lists all of those sitemaps. It's the index file that you submit in Google Search Console and Bing Webmaster Tools. That file should look like this:

XML Sitemap Example

So far, you have seen each sitemap's structure. Most websites will only need the page sitemap that includes the images on each page. That looks like this:

Sitemap Priorities

Adding priorities to your sitemap is one of the things many people do to differentiate between how important different pages are, but Google's Gary Illyes mentioned that Google ignores these priorities. In his exact words:

Generally speaking, as long as you are honest about when your content was actually modified, include it in your sitemap so that Google and other search engines know to re-crawl the modified page and index the new content.

How to Create a Sitemap

In this section, I will show you how to create a sitemap without using any generator or plugin. If your website is on WordPress or you'd rather use a generator (which makes this easy), skip to the next section.

These are the exact steps to follow to create a sitemap manually:

1. Decide which pages on your site should be crawled by Google, and determine the canonical version of each page.

Canonical versions are necessary when you have duplicate pages. For example, suppose you serve an international community and have pages for each location with the same language and content, like example.com/us/page and example.com/ca/page for US and Canada visitors, respectively.

In that case, it's important that you point to the original, which might be example.com/page or one of the two as the canonical. If you'd like to learn more about how this works, this post explains canonicalization in depth.

Furthermore, do not include URLs that are blocked by robots.txt files, require a login to access, or are password-protected, as search bots can't crawl them. You'll only get coverage errors in GSC if you add them.

2. Determine if you need more than one sitemap.

Several websites use separate files for pages, posts, and categories. Remember that if you have more than 50,000 URLs, you need multiple sitemaps.

3. Code all your URLs in XML tags to look like the type of sitemap you want to create.

This page explains how to use XML tags in further detail.

4. If you have multiple sitemap files, create a sitemap index file and include the links to the individual sitemaps you created.

This one is already described in the section titled "Sitemap Index".

Sitemap Generators

Most of us marketers do not have a web development background, so we can't code to save our lives. If the thought of manually crafting a sitemap gives you a headache, use a sitemap generator and save yourself 12 days of looking through complex coding.

There are several sitemap generators that you can use:

  • TechnicalSEO by Merkle has one where you can upload a CSV file with your URLs. It's especially great if you have different language versions of your pages (hreflang tags).If your website is custom-coded and is not on any CMS or builder that generates a sitemap, you need to use a generator like TechnicalSEO.
  • Screaming Frog SEO Spider also has one that I like to use with simple custom-built sites. In Screaming Frog, ensure you are using the spider mode. You can do that by clicking on "Mode" and selecting "spider". Then type the URL of your home page and let it crawl. When it's done, click on "Sitemaps."

For clarification on how to use Screaming Frog, take a look at the image below:

In order to save the XML file to your computer, tick all the options that matter to your site and click on "export". Then, upload that file to your server in the root directory.

Both tools do not automatically update the sitemap file. Some tools do but are premium, so you pay for the service.

However, you won't need to deal with any of the above if your website is on WordPress or an ecommerce platform like Shopify.

For WordPress sites, Yoast and Rank Math are popular SEO plugins that generate sitemaps and update them when you edit your posts and pages and Shopify even generates sitemaps automatically.

How to Submit Your Sitemap to Google

The best way to submit your sitemap to Google is through Google Search Console (GSC). There are other ways and additional steps as well, but I will start with GSC, because it's the most common method.

Follow these steps:

1. Go to Google Search Console and click on "sitemap."

2. Type your sitemap URL and click Submit. If you have multiple sitemaps with a sitemap index file, you only need to type the URL for the index file.

As an alternative, if you haven't submitted it to GSC, there is another way to let Google know you have one by adding this line in your robots.txt:

Sitemap: https://ift.tt/3jsBasS

But of course the URL here with the one you actually have. And if you have an index file, include only your index file here.

If (for some weird reason) you aren't using GSC, use the ping service to let Google know it should crawl your file. To do that, type the URL below in your browser:

https://ift.tt/3cQT7um

Replace https://ift.tt/2pqahKF with your sitemap URL.

And it's done!

Sitemap Best Practices

Now that you understand the importance of sitemaps, how they work, and your options for submitting them, let's make sure the final one you create is in tip-top shape by following these best practices.

1. Use tools to generate automatic sitemaps.

Manually creating and updating an XML sitemap will cost you a lot of time (and is unnecessarily complex). To save time so you can focus on other things like your next Netflix binge, it's best to use an automatic sitemap generator.

The ones mentioned for WordPress above come with that feature for free. For custom-built sites, you will have to pay, but in my opinion it's absolutely something worth paying for.

2. Do regular sitemap maintenance checks and updates.

All parts of SEO are an ongoing effort, so check your sitemaps regularly. Search console does an excellent job of letting you know if your submitted URLs have issues with crawling or indexing.

Check the 'Coverage' section in GSC regularly and update your site or sitemap when there are errors. The great thing about this is that it tells you what the exact error is with suggestions on how to fix it.

You can also use Screaming Frog for sitemap maintenance. After crawling your website or sitemap URL, check the response code tab for 404 or 5xx errors.

If you are using an automatic sitemap generator tool or plugin, update it when updates are available. Furthermore, periodically view the sitemap by going to your sitemap URL and checking if any page is missing or the last updated time is incorrect.

3. Prioritize high-quality pages in your sitemap.

Although Google no longer pays attention to the priority tag (or so they say), you can still add it because there's more than Google out there (yes, as an SEO I will admit it). Bing might pay attention to that tag, so it's still good practice to prioritize high-quality pages in your sitemap.

Sitemap priority shows which pages to crawl and index faster, so you can set priorities using values ranging from 0.00 to 1.00. But make sure not to use the same value for all pages or else Google won't be able to tell which is most important.

For values, you can go with something like this:

  • Homepage - 1.00
  • Main landing pages - 0.90
  • Other landing pages - 0.85
  • Main links on navigation bar - 0.80
  • Other pages on site - 0.75
  • Top articles/blog posts like hub pages - 0.80
  • Blog category pages - 0.75
  • Other posts - 0.64

4. Include only canonical versions of URLs in your sitemap.

Your sitemap should only contain URLs that you want search engines to index. That means if a URL points to another as its canonical version, you shouldn't include it, as it's a statement to Google and other search engines that you don't wish for that URL to be indexed.

Ignoring that and including that URL in your sitemap provides conflicting information to Google. The unintended URL might get indexed, or you will get coverage errors in GSC. So, only include the canonical versions, so you can consolidate your position in search engine results.

5. Split up your large sitemaps.

I mentioned this above already that you need to split your sitemap into multiple files if it exceeds 50MB or has more than 50,000 URLs. Never submit large XML files to Google, otherwise some of your URLs will not be indexed - and you know well that every URL matters!

One quick tip here is to save each file with easy to understand names (for you) like page_sitemap1.xml and page_sitemap2.xml.

And with that, I wish you happy sitemapping!

marketing


from Marketing https://ift.tt/3dtIIrH
via

Sharing is caring; Wednesday’s daily brief

Plus, Broad Match Modifier goes away in July

Please visit Search Engine Land for the full article.


from Search Engine Land: News & Info About SEO, PPC, SEM, Search Engines & Search Marketing https://ift.tt/2USfmwK
via

Google on how long it takes for SEOs to be indexed and ranked

Quality is one of the more important aspects of getting Google to index and rank your pages quickly.

Please visit Search Engine Land for the full article.


from Search Engine Land: News & Info About SEO, PPC, SEM, Search Engines & Search Marketing https://ift.tt/3hmL50p
via

Financial services advertisers in the UK must meet Google verification requirements by August 2021

ensure you meet the verification requirements to distinguish yourself from spam financial service advertisers and to prevent suspension.

Please visit Search Engine Land for the full article.


from Search Engine Land: News & Info About SEO, PPC, SEM, Search Engines & Search Marketing https://ift.tt/3jB4L3k
via